開発
How to create SOAP web service by using the Axis2
will
These days, I tried to deploy SOAP web service for the health2 api project. Here I would like to share some knowledge about how to deploy the SOAP web service using Axis 2
1. About the web service
As the web service becomes the choice for capsuling the business logic and provide the web service for recomposition. Two kinds of web services, SOAP based and REST based web service, communicating with the clients above on the HTTP protocol. The data are serialized in the XML or JSON, such kinds of well structured format. Therefore, the web service are cross platform, cross languages.
2. About the Axis 2
Apache Axis2 is a complete re-design and re-write of the widely used Apache Axis SOAP stack to build on the lessons learnt from Apache Axis.An advantage of Axis 2 is its support for the binding frameworks XMLBeans. Axis 2 with XMLBeans is widely used for building Web Services solutions with very complex schema definitions.The disadvantages of Axis 2 are its complexity and insufficient JAX-WS support.There is also no integration support for Spring. Currently the only available Spring support in Axis2 is by embedding a Spring container inside a service archive (AAR), i.e. implementing an Axis2 service using Spring. However, what most people are looking for is to embed Axis2 inside Spring, i.e. to configure and manage the Axis2 runtime (including the deployed services) using Spring application contexts. This is a serious limitation. This framework supports the REST accession. However, it need much more effort to realize the REST security mechanism.
3. Sample example about how to configure SOAP web service by using Axis2
Environment: CentOS 6, mysql 5.1.52, tomcat 6, Eclipse
4.Setting tomcat 6
1). install jdk
using the wget get the binary file jdk-6u29-linux-i586-rpm.bin in the /usr/java/
>chmod +x jdk-6u29-linux-i586-rpm.bin
>./jdk-6u29-linux-i586-rpm.bin
setting the $JAVA_HOME
>vi .bash_profile
add “export JAVA_HOME=/usr/java/jdk1.6.0_14” in the end of the file
2). install tomcat 6
setting as in the reference
3). setting the iptables (firewall of the CentOS )
>vi /etc/sysconfig/iptables
add “-A INPUT -m state –state NEW -m tcp -p tcp –dport 8080 -j ACCEPT” before “-A INPUT -j REJECT –reject-with icmp-host-prohibited”
restart the iptables
>service iptables restart
4)Installing the Axis2
Download the Axis 2 war distribution (axis2-1.4-war.zip) and unzip it. Copy the axis2.war file to the webapps directory in your tomcat installation. Copy this war file to “%CATALINA_HOME%/webapps/”. After a couple of seconds you should see an axis2 directory automatically created by tomcat.
5. Install Axis 2 Eclipse plugin
Downloading and installing Eclipse Axis2 plugin
The current version of the plugin is 1.4 and can be downloaded from http://archive.apache.org/dist/ws/axis2/tools/1_4/.
Download the following files from there:
a) axis2-eclipse-codegen-wizard-1.4.zip
b) axis2-eclipse-service-archiver-wizard-1.4.zip
Unzip the both files and then copy directories Axis2_Codegen_Wizard_1.3.0 and Axis2_Service_Archiver_1.3.0 in Eclipse plugins directory.
6. Create SOAP web service in the IDE environment
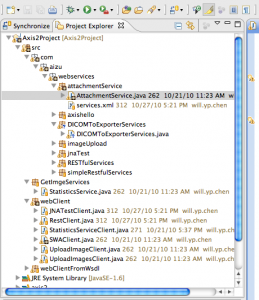
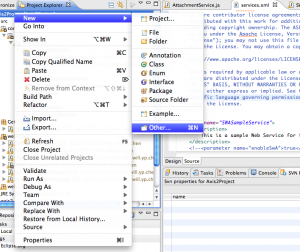
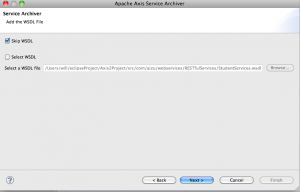
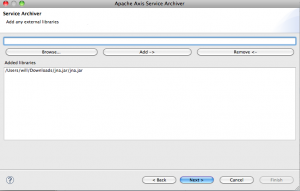
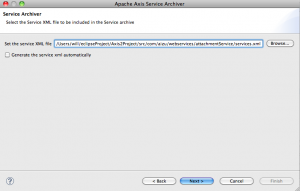
the package “attachmentService” has AttachmentService.java, which is the processing code for the service. And “services.xml” is configuration file for web service deployment.
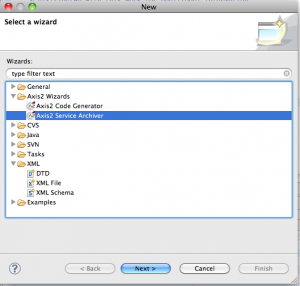
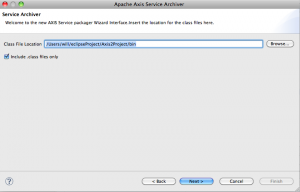
the XML file is the whole path of the services.xml in the package, mentioned above
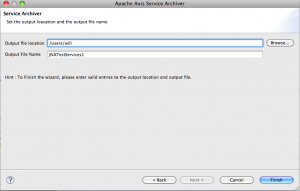
Then copy the JNATestServices1.aar to “%CATALINA_HOME%/webapps/axis2/WEB-INF/services”, if you modify the previous package, you had better to delete the previous one in the server.
 2025/12/12
 2024/12/06
 2024/09/13
 2024/05/17
 2024/05/10
 2024/01/05
 2023/08/18
 2023/07/14